Hello Friends,
In the last blog we learn about stateless widgets, you can check the last blog here -
https://bigakash.blogspot.com/2021/03/learn-flutter-3rd-day-flutter.html
In this post we will learn Stateful widgets and will see some common widgets that are used in building layout/UI for flutter applications.
So Lets get started!!
Stateful Widgets -
Stateful widgets maintain state that can be changed based on user interactions.
To build these widgets we require two classes - 1) StatefulWidget & 2) State class.
Stateful Widget object itself is immutable and can be regenerated but the State object persists over the lifetime of widgets to hold state/information.
There is a shortcut to create a Stateful widget in Android Studio. Just type 'stful' outside the widget class that we had created in last post example and it will generate the boilerplate code for 2 classes one for stateless widget and one for its state.
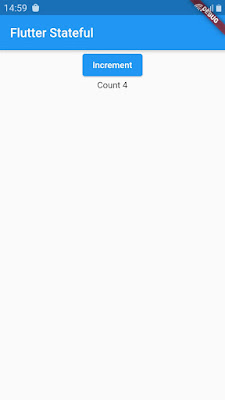
We will name this as StatefulCounter widget which will include a 'increment' button and a text which will show the count. The count will increase whenever we press the 'increment' button as below -
In the above code we have created a class _StatefulCounterState which will maintain the state of the widget. The _increment() method will be called when the button is pressed.
In the _increment() method we are calling setState() which indicates that some of the internal state has changed, at this time widget rebuild itself by calling build() method.
In the build() method we are returning the parent Scaffold widget with the Container widget in its body property. This Container widget can have one child only. So we have created a Center widget which will center its child. As its child we have created a Column widget which will have 2 children -
1) Elevated Button & 2) Text which will show the count.
Whenever we press this button the count will increase.
Useful Widgets -
1) Image - This widget is used to show images on the UI. There are several ways or constructors are provided to load the image as -
1) Image.asset To obtain image from assets folder.
2) Image.network To obtain image from link or url.
3) Image.file To obtain image from a file or local path.
Image.asset(
  "assets/images/image/exa.png",
  fit: BoxFit.cover,
)
2) Stack - This widget can contain multiple children widgets one above the others.
  child: Stack(
    children: <Widget>[
      Container(
        color: RED,
      ),
      Container(
        margin: EdgeInsets.symmetric(vertical: 10, horizontal: 20),
        color: BLUE_LIGHT,
      ),
      Container(
        margin: EdgeInsets.symmetric(vertical: 30, horizontal: 60),
        color: PURPLE,
      ),
    ],
  );
3) Container -
Container contains only one child and it can manage its width, height and background also.
Container(
  color: RED,
  child: Text("Hello world"),
  width: 200.0,
  height: 100.0,
  margin:
  EdgeInsets.only(left: 10.0, right: 50.0, top: 10, bottom: 30)

)
4) Row & Column -
We have already used these two widgets in our examples. These widgets can be used to show multiple widgets in one direction, The Row-widget will show widget in the horizontal direction and the Column widget will show widget in the vertical direction. We can also use 'mainAxisAlignment' to control the alignment of the widgets.
So here we saw Stateful widget and some useful widgets. You can check the complete code on github repository below -
https://github.com/akash-bisariya/LearnFlutterApp
In next blog post we will see how to build the screen layouts in a flutter application using widgets.
Thanks for the reading...


Very interesting post..
ReplyDeleteAbout - Learn Flutter day 4 : Stateful Widgets
Flutter App Development: 5 Major Advantages for Businesses
Flutter App Development company in India
We will take technology to places it has never been before. flutter app development became awesome as we did not just build the app, but the future. We know the value of your reputation so we are here to provide you best in class flutter development services.
ReplyDeleteWhy Choose Inwizards Flutter App Development Company?
Experienced Flutter Developers
500+ successful projects delivered
Mastery in latest technologies
Transparent workflow
Affordable
Support and maintenance
Diverse medium to interact with developers
If you want to achieve success for your business, Inwizards LLC provides the best flutter app development company
.
Feel free to get in touch with us for further discussions and pricing details. Here are our contact details:
Website Address: https://www.inwizards.com/hire-flutter-developer.php
Email: info@inwizards.com
Call: USA - +1-(979)-599-0896, IN- +91-9667584436
ReplyDeleteVery Informative and creative contents. This concept is a good way to enhance the knowledge. thanks for sharing.
Continue to share your knowledge through articles like these, and keep posting more blogs.
And more Information React native for mobile application development
You have written an excellent blog. I learned something new from your Blog. Keep sharing valuable information. WDP Technologies
ReplyDeleteGrateful to learn about Stateful Widgets. Thank you so much for sharing these day wise learn.
ReplyDeleteFlutter App Development
Thanks for sharing this nice information blogs. We are a flutter app development company in the USA.
ReplyDeleteyou have written the informative blog . for more information related to flutter app development . visit our website.
ReplyDeleteYour articles always generate interesting database. That means your writing is interesting to people.thanks for sharing .please visit our website you got more information about Construction Supervisor Course civil supervisor course in mumbai
ReplyDeleteUnderstanding Stateful Widgets is crucial for building dynamic Flutter apps. Mastering their lifecycle and managing state ensures smooth user interactions. Need expert guidance? Hire Flutter developers to navigate complexities and unlock your app's full potential.
ReplyDeleteGreat post on Stateful Widgets in Flutter! It's awesome to see how you break down the key concepts and make it easy to understand the difference between stateful and stateless widgets. Day 4 is a game-changer for beginners, as managing state is essential for interactive apps. Looking forward to more insights as this series continues—thanks for the clear examples and tips!
ReplyDeleteThis blog on “Learn Flutter Day 4: Stateful Widgets” offers clear insights into managing dynamic UI updates efficiently. Developers can explore similar learning paths or connect with HireFullStackDeveloperIndia for expert Flutter development support and hands-on guidance in building scalable, interactive mobile apps.
ReplyDelete