Learn Flutter day 4 : Stateful Widgets

Hello Friends,

In the last blog we learn about stateless widgets, you can check the last blog here -

https://bigakash.blogspot.com/2021/03/learn-flutter-3rd-day-flutter.html

In this post we will learn Stateful widgets and will see some common widgets that are used in building layout/UI for flutter applications.

So Lets get started!!

Stateful Widgets -

Stateful widgets maintain state that can be changed based on user interactions.

To build these widgets we require two classes - 1) StatefulWidget & 2) State class.

Stateful Widget object itself is immutable and can be regenerated but the State object persists over the lifetime of widgets to hold state/information.

There is a shortcut to create a Stateful widget in Android Studio. Just type 'stful' outside the widget class that we had created in last post example and it will generate the boilerplate code for 2 classes one for stateless widget and one for its state. 

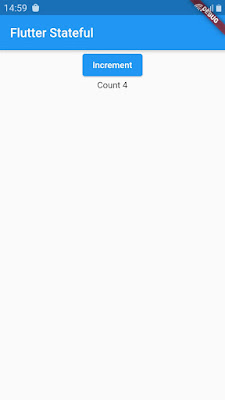
We will name this as StatefulCounter widget which will include a 'increment' button and a text which will show the count. The count will increase whenever we press the 'increment' button as below -

In the above code we have created a class _StatefulCounterState  which will maintain the state of the widget. The _increment() method will be called when the button is pressed.

In the _increment() method we are calling setState() which indicates that some of the internal state has changed, at this time widget rebuild itself by calling build() method.

In the build() method we are returning the parent Scaffold widget with the Container widget in its body property. This Container widget can have one child only. So we have created a Center widget which will center its child. As its child we have created a Column widget which will have 2 children -

1) Elevated Button  & 2) Text which will show the count.

Whenever we press this button the count will increase. 

Useful Widgets -

1) Image - This widget is used to show images on the UI. There are several ways or constructors are provided to load the image as -

1) Image.asset To obtain image from assets folder.

2) Image.network To obtain image from link or url.

3) Image.file To obtain image from a file or local path.

Image.asset(
"assets/images/image/exa.png",
fit: BoxFit.cover,
)

2) Stack - This widget can contain multiple children widgets one above the others.

  child: Stack(
children: <Widget>[
Container(
color: RED,
),
Container(
margin: EdgeInsets.symmetric(vertical: 10, horizontal: 20),
color: BLUE_LIGHT,
),
Container(
margin: EdgeInsets.symmetric(vertical: 30, horizontal: 60),
color: PURPLE,
),
],
);

3) Container -

Container contains only one child and it can manage its width, height and background also.

Container(
color: RED,
child: Text("Hello world"),
width: 200.0,
height: 100.0,
margin:
EdgeInsets.only(left: 10.0, right: 50.0, top: 10, bottom: 30)

)

4) Row & Column -

We have already used these two widgets in our examples. These widgets can be used to show multiple widgets in one direction, The Row-widget will show widget in the horizontal direction and the Column widget will show widget in the vertical direction. We can also use 'mainAxisAlignment' to control the alignment of the widgets.

So here we saw Stateful widget and some useful widgets. You can check the complete code on github repository below -

https://github.com/akash-bisariya/LearnFlutterApp

In next blog post we will see how to build the screen layouts in a flutter application using widgets.

Thanks for the reading... 

Learn Flutter Day 3 - Flutter Architecture & Widgets

Hi Friends,

Today we will learn about Flutter Architecture, how it works under the hood and then we will learn about Widgets to develop UI interfaces in Flutter.

Let's Get Started!!

Flutter Architecture-

Flutter is an open source cross platform development toolkit, It is designed to reuse the same code with different platforms like Android, iOS and Web.

In development phase Flutter applications runs in VM and then for release they are directly compiled to machine code.

Flutter is designed as an layer system with no layer has privileged access to the layer below.

Developers interact with the Flutter Framework. It provides a reactive framework written in Dart language which includes Foundational libraries like animation, painting etc, rendering layer (converting UI code into pixels) for rendering layouts, Widgets layer for rendering objects for layout and then Material & Cupertino library for implementing Material or iOS design language.

The core of the Flutter is Flutter Engine written in C++. It is reponsible for rasterizing composited scenes whenever a new frame needs to be painted. It provides the low level implementation of Flutter's core API, I/O, plugin architecture and Dart runtime and compile toolchain.

A platform specific Embedder coordinates with the underlying operating system for services like rendering surfaces, accessibility and input. It is written in language appropriate for the platform like Java/C++ for Android, Objective C/Objective C++ for iOS and macOS and C++ for Windows and Linux.

Flutter Widgets-

In Flutter widgets are everything from images, icons to layouts of the application. These are classes used to build UI elements. We can make complex widgets or layouts by composing simple widgets.

A widget declares its user interface by overiding the build() method. This method is designed to be fast so that it can be called by the framework whenever needed to render the frame. On each rendered frame Flutter can recreate only those parts of the UI where state has changed by calling that widget's build() method. Therefore it is important that build method should return quickly and heavy computational task should be done in asynchronous manner.

Widget State-

A widget can be of two types - Stateless or Stateful.

Widget that don't have any properties that can change over time like icon or label are Stateless Widget.

Widget that needs to change based on  user interaction or any other factors are Stateful widget.

There are various widget available in Flutter framework such as Center, Text, Row, Column, Stack, Container etc and some top level widget like MaterialApp and CupertinoApp.

Stateless Widget Example-

Now we will see how to create a stateless widget in the Flutter. Also we will learn including external package/library. Here we have used open source package named 'english_words' which contains some most used english words  and will display these words randomly on Home-Screen. Lets see main.dart file now -


In the above code first we create a main() function which simply calls the runApp() function that contains a widget MaterialApp. This widget is required to implement material design in application. It contains title property and home property which is used for routes or top level Navigator. Navigator helps in transitioning smoothly between screens. The home property calls the FlutterHome() class as below -


This class extends with StatelesWidget. As we know Stateless widget need to override build() method to display the widget in terms of other lower level widget.

This function will return the Scaffold class which is also a widget that provides a default App bar, a title and a body property that holds widget tree for the Homescreen. In body we have added a Column widget which displays its children in a vertical array. Then we have 2 Text widgets as children of the column widget, we will show random words in these 2 widgets.

Using External Package-

To use the external package 'english_words'we need to append - 'english_words: ^3.1.5-nullsafety.0'

to the dependencies list in pubspec.yaml file as below -

dependencies:
  flutter
:
    sdk
: flutter

  cupertino_icons
: ^1.0.2
  english_words
: ^3.1.5-nullsafety.0  

Now import this package in main.dart file as -

import 'package:flutter/material.dart';
import 'package:english_words/english_words.dart';

Now to get the random words we use WordPair.random().asPascalCase

This will return random word each time we click on hot reload or save the project.

So here we saw StateLess widget in action. You can check the code on github repository below

https://github.com/akash-bisariya/LearnFlutterApp

In next blog post we will see how to create Stateful widgets which change on any user interaction.

Thanks for reading... 


2nd day with Flutter - Dive into Dart!!


Hello Friends,

This is 2nd blog on this series #30DaysOfFlutter.

In the last blog we learn about how to install/setup the flutter. You can check my previous blog if you had not done it yet -

https://bigakash.blogspot.com/2021/02/1st-day-with-flutter-hello-flutter.html

I know I am not able to post blog regularly but I will try now to be regular for this series.

So Lets Gets Start!!

As we know for flutter development the programming language used is #Dart which is made by Google, so in this post we will dive into dart language and try to get familiar with it so that we can start writing flutter applications.

Dart is an object oriented programming language and its syntax is very much smilar to java or other object oriented langauge. We will see here some important concepts/features/syntax that differentiate it with other languages -

1. Main function - Each app must have a top level main function as shown below -

// Entry point of the application
void main() {
  var name = 'XYZ'; // Declare and initialize a  string variable.
  print(name); // Display name on console.
}

2. Functions - Function are usually created in following way -

Integer sun(Integer a, Integer b) {
  return a+b;
}
You just need to define return type, function name and function body to create a function. In Dart inserting the return type is even not required as it can use type inference to infer the return type.

Arrow function can also be used which is a function with only one line of code for example -

void printName(String name) => print(name);

3. Function Parameters - A function can have 2 types of parameters : Required & Optional
The optional parameter can be of two types - Named & Positional.

Lets see an example of 'Named' parameter first which are declared using curly brackets ({}).

/// Two optional parameters - firstName & lastName
void printHelloWorld({String firstName, String lastName}) { print(...) }
We can call this function as -
printHelloWorld(firstName: 'ABCD', lastName: 'EFGH');
Also If required you can make 'Named' parameters mandatory in a function by annotating them with @required attribute.

To declare 'Positional' parameters we need to use square brackets ([]). Following is an example of it -

String printMessage(String firstName, String lastNAme, [String message]) {
  var text = 'Hello $firstName $lastNAme';
if (message != null) { text = '$result $message!!';
} return text;
}
You can call this function with or without the 'message' parameter as -

printMessage('Akash', 'Bisariya');   // Hello Akash Bisariya
printMessage('Akash', 'Bisariya', 'Good evening')   // Hello Akash Bisariya GoodEvening!!
 

4. Variables - Dart does not have keywords public, protected and private. If an identifier starts with an underscore ( _ ) , it will be private to its library/dart app. You can also use 'var' keyword to create a variable -

var name = 'XYZ';
Dart language has some built in types -
  • numbers - It's further divided into 2 types - integers(int) & doubles(double)
  • strings - You can use either single '' or double "" quotes to create string.
  • booleans - 
  • lists (also known as arrays)
  • sets
  • maps
  • runes (for expressing Unicode characters in a string such as laughing emojis)
  • symbols (these are compile time constants)
5. Classes - You can define a class simply by using 'class' keyword followed by its name. You can create object of this class by using its constructor. To define class constructor we have 2 ways  -
1) Generative constructor & 2) Named constructor.
Follwing is an example of both -
class Person{ String name; String lastName; String this.age;

Person(this.name, this.lastName);  Person.newEntry(){this.age=0}   }
var p1 = new Person(2, 2);
var p2 = new Person.newEntry();
6. Mixins - Its a relatively new feature when comapring with other object oriented language like java.
By 'Mixin' we can reuse the class code in mulitple class hiearchies. Dart uses 'with' keyword for this feature.
class A extends object {
  .....

  void printMessgae() {
    print("This is mixin class")
  }
}
class B with A
  {
 ....
}

Now you can use the 'printMessage' method with the object of class B.

You can only extend the 'Mixin' class with Object class.


So friends these are some features of Dart language, we will use these features when developing the Flutter applications later.

For more detailed review of Dart language you can use the following official Doc -

https://dart.dev/guides/language/language-tour

Thanks for reading. From next post we will start developing the Flutter application.

1st day with flutter - Hello Flutter!!

Hi Friends,

I am here with you to share the First day experience of #30DaysOfFlutter.

In this series we will learn flutter together!!

So we will run today hello world application using flutter step by step.

First Step - Installation

This is the most tricky part for any new developer who is started learning Flutter. Go through following steps of installing flutter sdk.

First you need to go to flutter get-started link  as below -

https://flutter.dev/docs/get-started/install

You need to select you operating system here for downloading the Flutter installation bundle.

Here I will go for the windows OS but the steps for all the OS will be same.

After downloading extract the zip file and place the flutter folder in the desired directory for ex -  C:\src\flutter

Second Step - Add Environment Variable

This is the second important step before running our first Flutter application. 

In this we will add Flutter to Path environment variable. So first type 'env' in the start bar and select Edit Environment variables for your account.

Now under User variable  check if there is an entry called 'Path'

  • If the entry exists, append the full path to flutter\bin using ; as a separator from existing values.
  • If the entry doesn’t exist, create a new user variable named Path with the full path to flutter\bin as its value.

This step is also required to run Flutter commands in terminal.

Third Step - Run Flutter Doctor

From the terminal window goto the Flutter directory and run the following command -

This command will check your environment and displays a report of the status of our Flutter installation.

Final Step - Set up IDE :- Android Studio

Android studio offers a complete IDE experience for Flutter. You can also use others IDEs such as IntelliJ for an Android developer android studio is preferrable option. 

Start Android Studio and open Plugins from menu. Search for Flutter plugin and install that. Click yes when prompted to install the Dart plugin.

Now restart the Android Studio.

Create Flutter Project

Start a new Flutter project from File --> New.

Select Flutter application as the project type then click on Next.

Verify the Flutter Sdk path specifies the SDK's location. If this field is empty then provide the Flutter SDK path here - for example

C:\src\flutter

Enter the project name and then click on Next. 

Click finish.

Wait for android studio to create the project.

You may need to configure the Dart Sdk path if Dart not configure error is coming after the project creation.

You can provide Dart sdk path as below -

c:\src\flutter\bin\cache\dart-sdk

Run your First Flutter App now

In the android studio toolbar select the android device emulator before running your first app. You can also connect your own device via Usb and run the app on the device.

Yeah we have done that!!!


This is our first Flutter app running in the device. 

So we have completed the first day with flutter and running our sample flutter application.

You can find the source code on my github repository -

https://github.com/akash-bisariya/FirstFlutterApp

Thanks guys please do post any question or issue in the comments.


Flutter Learning Series

Hello Everyone,

Here I am exciting to share with you a new blog series based on #30DaysOfFlutter. I was waiting for the event like this to learn the Flutter from the basic since long time.

Flutter is basically an open source cross platform software development kit to develop applications not only for mobiles but also for desktop clients like Windows, Linux or Mac.

The course #30DaysOfFlutter is created by Google which says that by the end of 30 days we will have 1 month of Flutter experience and we will be on the way to create our first Flutter app.

I am really excited now:) 

It will be starting from 1st Feb 2020. Although the registrations are closed now for this course but I will be sharing all my learnings of this course on this blog over the next month onwards.

You can also let me know your views in the comments.

Thanks.

Flutter : Using Form and Text Fields

Flutter is a popular cross-platform mobile development framework that allows developers to build native apps for both Android and iOS using ...